Four times each year the Calligraphy Guild of Indiana holds a calligraphy inspired exchange in which members may participate. The talented Julia Fish Thompson is our fearless leader for these exchanges, and the theme she chose for this quarter's exchange was A Useful Object. Participants were to put their lettering on a useful, 3D object. I thought about trying to letter on one of those pashmina scarves, but I thought everyone might be doing that. Instead, I decided to make button magnets using the letters of my exchange recipient's name.
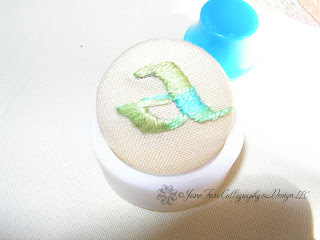
I found some polka dot fabric that I thought would work great for the project. I roughed in the letters with a Micron .01 pen. The first letter I did was the script J, as seen in the first photo. It may have been due to my lack of embroidery skill, but I wasn't thrilled with how it turned out. For my second attempt, I tried combining my exchange partner's first and last initials in a wider style of script. It seemed to work better, but I decided my stitching skills required bulkier letters.
I used 3 strands of multicolored embroidery floss.
When I was finished with the embroidery, I trimmed around the letters leaving some margin.
I used a button making kit. They sell these in several sizes. (I suppose it would have been very helpful if I had saved the packaging in order to list the manufacturer and the two sizes I purchased...) I know Dritz makes them, although mine were not made by Dritz. I purchased mine at Hobby Lobby.
I centered the embroidered letter over the button cover and put it into the rubber form, face down.
I cut the shank off of the button back.
Using the little "pusher" provided in the kit, I pushed the button back onto the button cover until it snapped into place. The manufacturer provides directions on the back of the button kit packaging.
This step is finished! I had trouble keeping some of the letters centered during the "pushing" step.
I purchased these magnets from Amazon. I used the .5 inch on the smaller buttons and the .75 inch on the larger buttons.
I attached the magnet with hot glue.
As quickly as I could after gluing on the magnet, I held it against a wall in order to have it dry nice and level.
I tested them on my fridge, and they worked great!
All bagged up and ready to go...
I also made one for Matt and one for Rachel. :)
These were fun to make, and I thought you might like to give it a try.
Thank you for your prayers and concern over last week's storms. I hope you and your families are safe and well. Unfortunately, areas in the southern part of the state were devastated. In central Indiana, we were very fortunate to have had only wind, rain and hail.
xo
Jane


How cute! Jackie will have so much fun using them.
ReplyDeleteOh to be in your exchange! So creative, delightful and functional!
ReplyDeleteToo clever for words!
ReplyDeleteBeautiful!!!!!!!! Love seeing work with needle and thread!
ReplyDeleteThis is a fabulous idea. I sew and am always looking for ideas to use this skill in conjunction with the other things I enjoy, like calligraphy. I will be making some of these soon. Thanks for sharing.
ReplyDeleteRebecca
brrck@yahoo.com
great project! i'm going to pin it!
ReplyDeleteI am the Jackie that this guild exchange came to, and YES I am having fun using them!! They are sooo colorful, and look great on my fridge!!
ReplyDeleteThese are beautiful as well as practical!
ReplyDeleteWow, Jane, these are SO beautiful but I cannot believe how many steps involved in that little project. That cute little bag represents multiple hours! A wonderful present, indeed! Have a great week! And thank you for the birthday wishes!
ReplyDeleteThese are SO cute! What a creative idea Jane.
ReplyDelete